Every journey has to start somewhere. In today’s world, there are many options to make video games. Today I will concentrate on just one of those options This article will tell you how to make a game in Unity for free.
Unity is one of the best, if not the best way to make a video game for absolutely free.
Today, we are going to make a simple clicker game. This is perhaps the simplest possible game that you can make with Unity.
The objective of the game is to click the sphere and reach a certain number of points. Then you win! The player is then able to restart the game by pressing R, or exit the game by pressing Escape.
Setting up the Project
First, if this is your time using Unity, you need to download Unity and install it. Follow these steps.
- Open your web browser and go to the official Unity download page at https://unity.com/download.
- Select “Download Unity Hub” for your platform (Windows, Mac, or Linux) to get started.
- Once the Unity Hub installer is downloaded, run the installer.
- Follow the on-screen instructions to complete the installation process.
- After installation, launch Unity Hub
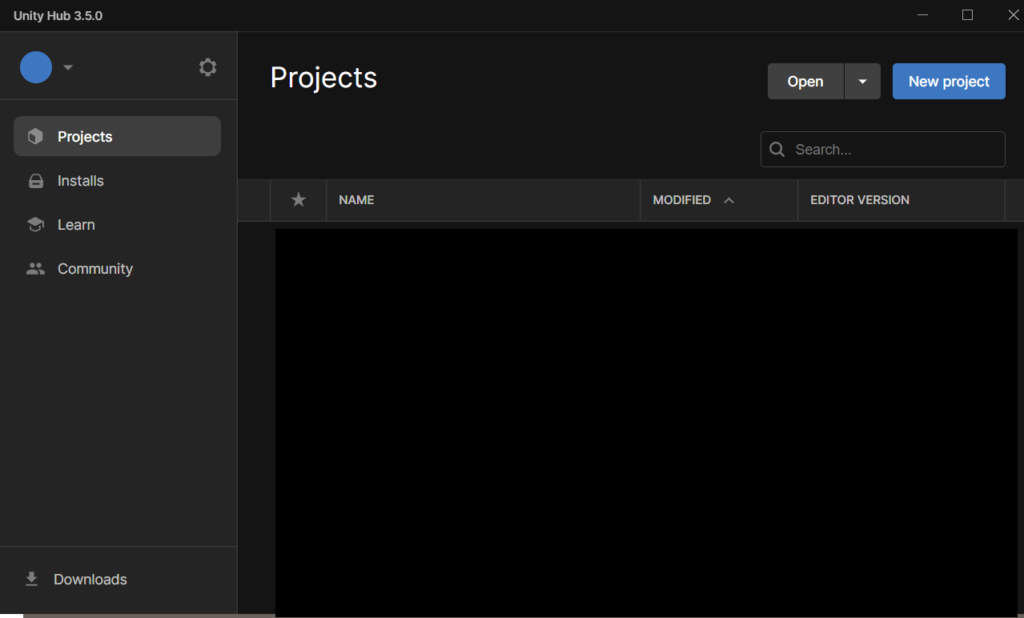
- If you have a Unity ID, sign in to your account using your credentials.
- If you don’t have a Unity ID, you can create one for free by clicking “Sign up.”
- In the Installs sidebar menu, click Install Editor and select the Unity version you want to install. For beginners, it is recommended to choose the latest LTS version. At the time of this writing the latest LTS version is Unity 2022.3.6f1.
- For now, don’t add any modules, just click Install
- The installation may take some time, it is about a 7.5 GB download.
Create a New Project
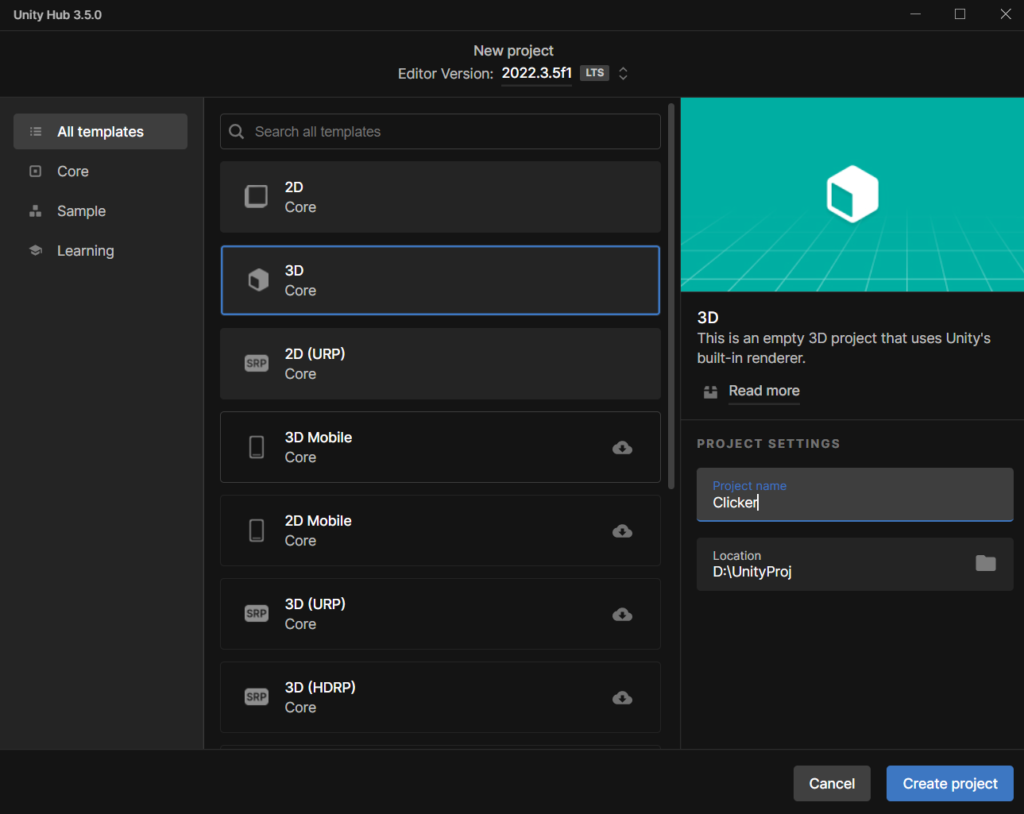
Once you have the Unity Editor installed, go to the Projects sidebar menu in Unity Hub. Click the “New Project” button.
A list of available templates is listed, click the 3D Core project template. Then on the right side of the screen, type in your project name (mine is called Clicker Game), and set the location on your hard drive where you want it to be installed.
Then click “Create project”. Unity will start creating your project and once it is finished the Unity editor will be open with your new project loaded.
At this point, you are ready to finally start making the game.
Importing Assets
The first thing we need to do is import some assets. Assets are 3D objects that we can use to make a game. In our case, we need a sphere, and and some text for the user interface. A camera and directional light has already been created by default.
But we need not go searching the asset store, we can just make these objects right in the Unity editor. This is what professional game developers do when starting to make a prototype of their game, they just use simple 3D objects. Once the gameplay is in place, then the 3D objects can be swapped out for more pretty looking assets.
Clicker Model
For the clicker model, we are going to use a sphere. In this case, it is the thing that the player will click on. To create it, in the hierarchy, you press the + button, select 3D Object, and then Sphere from the drop-down menu. This will create a default sphere in your scene.

UI Text
We need some UI text for our game. Unity uses TextMeshPro for UI text, and this is installed by default.
To create some text, press + in the Hierarchy once again, select UI, and then Text – TextMeshPro
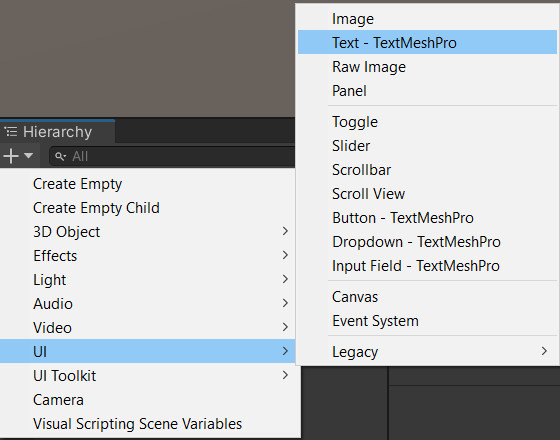
The first time you use it, it will pop up a window with a button that says “Import TMPro Essentials”. Click that button and it will install some dependencies, and then create your text object. Once it is done you can close the Import dialog box.
Rename the new text to ScoreText.
You can rename an object by clicking on it in the hierarchy, and then in the Inspector Window you can rename it. Alternatively, you can click it in the Hierarchy, then single click it again, and it will allow you to rename it
We need to move the text, by default it is in the middle of the screen. We want to anchor it to the top right hand corner. So to do this, select the anchor button in the Inspector while the ScoreText is selected, and it will pop out a window. All you need to do is select the top right icon as shown below.
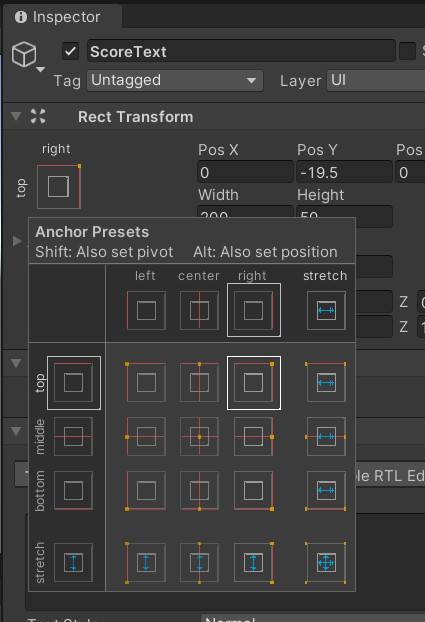
The text itself will not be visible on the Scene view, so swap over to the Game view to see where it will end up in the game.
The text will not move, but now it’s position is relative to the top right corner. So to get it to move to the top right corner, you just need to set the X and Y position to 0 and around -20. This should move it to the top right of the screen. Set the “Text Input” field to “Score: 0”.
We will create 2 more UI Text objects, rename them to GameOverText and InstructionText. Move the InstructionText below the sphere by adjusting it’s Y position. Hover your mouse over “Pos Y” and you can drag the value interactively, this makes it much easier to adjust the position visually.
You can leave the GameOver Text in the center. Change its color to black by clicking the Vertex Color property in the Inspector (scroll down to see it) and selecting black or any other color that makes the text more visible. Set the Text Input property to “Click the sphere to score”.
Implementing Game Logic
Now that we have all our assets in place, we can implement the simple game logic.
Creating the Clicker script
In the Project pane, click the + icon, and select C# script from the menu, it’s way at the top.
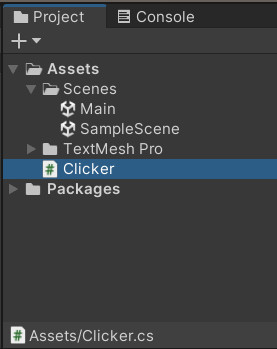
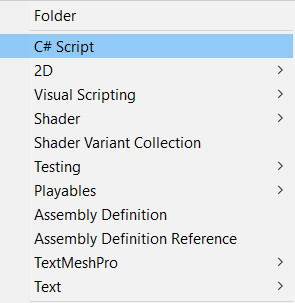
Name it Clicker. Then press enter, and give it a couple of seconds to compile the script. Then double-click it, and it should load Visual Studio and load the script for editing.
Implementing the code
This is what you should see in the editor. It is what Unity creates by default when you create any new C# script.
public class Clicker : MonoBehaviour
{

   // Start is called before the first frame update
   void Start()
   {

   }

   // Update is called once per frame
   void Update()
   {

   }
}
The Start() function is what runs when you run your game, the Update() function runs once per frame, so if your machine runs at 60 frames per second, it will run 60 times per second. This can and does vary depending on the hardware. These are just two of the events that Unity’s game engine automatically runs for you. If you want a full list and a diagram of all the Unity built-in events, you can look at the script lifecycle flowchart in the Unity documentation.
If you look at their diagram, just before Update it runs something called OnMouseXXX:

There are several mouse input events denoted by the XXX, one of those is called OnMouseDown(). It runs every time a game object is clicked on. So if we implement that function, we can get it to run our game’s code every time the sphere is clicked.
But first we need to add a couple of variables to our script. One to hold the score, and the other one to represent the ScoreText Text Mesh Pro object.
Let’s add these at the top right before the Start function:
private int score;

public TextMeshProUGUI textScore;
The score is an integer, and the text object is represented by a “TextMeshProUGUI” object. You may get a red line under it, by default, the import for Text Mesh Pro is not included, so we’ll need to add a line to the includes at the top:
include TMPro;And that should resolve the issue.
So with variables in place, add this function to your script:
private void OnMouseDown()
{
   score++;
   textScore.text = "Score: " + score;
}
The first line adds 1 to the score, and the second line updates the UI text element with the new score.
So now you can hit Ctrl+S to save, and go back to Unity, and press the run button once it is done compiling.
If you play the game right now, you may notice that it does not work. If you look in the Console tab, you’ll see an error:

This is a common issue in Unity where we can forget to set up references to objects in our Game Objects that have scripts that reference them. In our case, we set up a TextMeshProUGUI object that expects us to set up a reference to it in the inspector.
So stop the game, and click on the Sphere object, and look in the Inspector under the Clicker component:

You will see that “None” is set for Text Score. It wants us to select a Text Mesh Pro UGUI. So to do that, we can either drag and drop the ScoreText from the Hierarchy on top of this field, or you can click the target icon at the right and double-click the ScoreText in the list.
Once selected, play the game again, and it should now work. You can click the sphere forever and it will keep counting up.
Gameplay and Polishing
Win Condition
This is not exactly a full game, most games have a win condition, so we’ll add one for ours. Let’s say the player wins when they have scored 100 points. When this happens, we can consider it to have reached a Game Over condition.
Game Over Condition
When the score reaches 100, we want to display some text that tells the player they have won. We also want to keep track if the game is over or not.
To do this, we need a variable to track the state of the game. C# gives us a “True/False” variable called a bool to do this.
So we just need to create a new bool and initialize it to false at the top of our code above the Start function:
private bool isGameOver = false;We also want a variable to track what the score target is, so that if it reaches that target the game is over. For this, we will expose an integer to the inspector, so we don’t have to hardcode it:
public int scoreTarget;And we need a game over text as well, so create a text variable:
public TextMeshProUGUI textGameOver;So at this point the top section of your script should look like this:
private int score;
public TextMeshProUGUI textScore;
public TextMeshProUGUI textGameOver;
public int scoreTarget;
private bool isGameOver = false;
So to check if the game is over, we can check in the Update function if the score has reached the target:
if (score >= scoreTarget && !isGameOver)
{
   isGameOver = true;
   textGameOver.gameObject.SetActive(true);
}
This says that if the score reaches 100 or goes over, and the game is currently not over (!isGameOver), isGameOver is set to true, and the game over text object is set active.
(!) is the “Not” operator in C#, if you put it in front of a variable then you’re checking that it is not a certain value. In this case it means isGameOver is false or “not true”.
SetActive is a Unity function for all game objects that allows you to turn them on and off. When you SetActive(true), it makes it visible, if you set it to false, it makes it invisible. This is the same thing as if you clicked the check box next to a game object’s name in the Inspector.
So now we know the game is over, we need to add some code to prevent the score from still incrementing. Change your OnMouseDown code to this:
if (!isGameOver)
{
   score++;
   textScore.text = "Score: " + score;
}
All we’ve done is wrap it in an if statement that checks if the game is not over. So if the game is not over, it will continue incrementing the score.
Restarting the Game
Most games have a way to restart the game or exit the game once the game is over. We should add that for this game as well.
We want to have some text that tells the player how to restart or exit the game. Typically these features are implemented with UI Buttons but for this tutorial we’ll just use Text and keyboard commands.
Unity’s “old” input system is what we will use. It’s perfectly fine to use it, but there is a new input system that we won’t cover here. The old input system is easy to understand for beginners.
So we want to check if the user has pressed the “R” key. If they have, we want to restart the game.
// Restart the game
if (Input.GetKeyDown(KeyCode.R))
{
   SceneManager.LoadScene(0);
}
To check for keyboard input we are using Input.GetKeyDown. It detects if a key was pressed. There are also other keyboard events such as GetKeyUp and GetKey. GetKeyUp detects if a key was just released, and GetKey detects if a key is being pressed. You can use GetKeyUp if you want it to restart only after the player releases the key. Try it and see what the difference is.
The KeyCode.x is an enumerator that Unity gives us to specify which key we want to check. Once you type in KeyCode. Visual Studio’s intellisense will pop up a list of valid key codes that you can scroll through to see what is possible.
We are using Unity’s Scene Manager to reload the game. LoadScene takes one parameter of the scene number. And since there is only one scene in our game, it is scene 0. So this will cause Unity to reload the scene, and reset all of our variables back to defaults.
Exiting the Game
To exit the game, we will use GetKeyDown again and check for the ESC key being pressed. If it is pressed, the game will exit.
This is normally accomplished with
Application.Quit();This won’t work inside the Unity editor, it will only work from a build (see below section). So while inside the editor, we need to use a compiler directive, which is like an If statement that the compiler uses at run time.
So to implement that we need:
// Exit the game
if (Input.GetKeyDown(KeyCode.Escape))
{
#if UNITY_EDITOR
   UnityEditor.EditorApplication.isPlaying = false;
#else
   Application.Quit();
#endif
}
If the user presses ESC, we will either execute
UnityEditorApplication.isPlaying = false;if we are in the editor, or
Application.Quit(); if we are inside of a build.
Wrapping up the code
Lastly, we just need to set the Game Over Text to “You Win! Game Over” or whatever you would like, and position it on the screen like we did the Score Text, where ever you want.
For the Instruction Text, I just put “Click the sphere to score.” and put a second line under it that says “R to Restart” and a 3rd line that says “ESC to Exit”.
Also make sure your gameOverText is assigned to the Clicker component in your sphere object so you won’t get an error.
Make sure to update the Score Target field on the Clicker component on the Sphere to be whatever value you want. By default it is 0, that would make for a short game, so update that to a larger number!

You should be able to go into play mode and play the game.
Building the Game
At this point our game is playable and we can build it to the default platform, which since we did not add any other build targets, will be Windows, Mac or Linux depending on which platform you installed Unity on.
Building a game is pretty simple, you just go to the File->Build Settings… menu in Unity, it will pop up this window:

You don’t have to change anything here except click “Add Open Scenes” to add your scene to the “Scenes in Build” section, if it is not already there. Otherwise, just click Build or Build And Run. Either way it will prompt you to select a folder to store the build in, I usually create a Builds folder under the project folder. When you select the folder, it will build your game. If you selected Build, it will pop open an explorer / finder window with your executable, that you can just double-click to run. If you selected Build and Run it will just run it full screen as soon as the build is completed.
You will notice that Unity automatically puts a “Made with Unity” intro to your game. This is automatically done for users of the Personal edition. If you upgrade to Pro you can get rid of that. But for most indie developers, it’s perfectly fine.
At this point you should have a working game. It’s not much, but it’s a game!

The full code of the Clicker script is here in case you run into any problems:
using System.Collections;
using System.Collections.Generic;
using UnityEngine;
using TMPro;
using UnityEngine.SceneManagement;
using Unity.VisualScripting;

public class Clicker : MonoBehaviour
{
   private int score;
   public TextMeshProUGUI textScore;
   public TextMeshProUGUI textGameOver;
   public int scoreTarget;

  private bool isGameOver = false;

   // Start is called before the first frame update
   void Start()
   {

   }

   // Update is called once per frame
   void Update()
   {
   if (score >= scoreTarget && !isGameOver)
   {
     isGameOver = true;
     textGameOver.gameObject.SetActive(true);
   }

   // Restart the game
   if (Input.GetKeyUp(KeyCode.R))
   {
     SceneManager.LoadScene(0);
   }

   // Exit the game
   if (Input.GetKeyDown(KeyCode.Escape))
   {
#if UNITY_EDITOR
     UnityEditor.EditorApplication.isPlaying = false;
#else
     Application.Quit();
#endif
   }
}

private void OnMouseDown()
{
   if(!isGameOver)
  {
     score++;
     textScore.text = "Score: " + score;
  }
 }
}
Conclusion
As you can see, it is relatively easy and simple to create a simple game with Unity completely for free. You can now experiment with adding more features and mechanics to your game.
But I know that most beginniing Unity developers do not really know how to do that at first, so I recommend the completely free training that Unity offers at Unity Learn. I recommend starting with the Unity Essentials pathway, and then do the Junior Programmer pathway.
After those you will know how to make a lot of different types of games. And once you are finished those, you can go on to the more advanced topics they have. There really is a lot of content for free on Unity Learn, so take full advantage of it.
If you have any questions or problems you need help with, please leave a comment down below and I will get back to you.
