
Introduction
Since its debut in 1972, Pong has become one of the most iconic video games of all time. This simple game of two paddles hitting a ball back and forth has become a cultural phenomenon and a cornerstone of the gaming industry. Over the years, Pong has been ported to just about every platform imaginable, from the arcade to the web. In this article, I’ll take the Pong game that we developed in Pygame in a previous article and port it to Unity.
In this blog post, we will discuss what it takes to port Pong from Python to Unity. We will explore the differences between the two languages, the advantages of using Unity for game development, and the steps needed to successfully port a Python game to Unity. By the end of this post, you’ll have a better understanding of the process of porting a game from Python to Unity and the potential benefits of doing so. So, let’s dive into porting Pong from Python to Unity!
First, we’ll take a look at the differences between Python and Unity.
Pygame and Unity are both game engines. However, there are differences in how they work. In our previous implementation of Pong, the code was all entirely in one script, pong.py. All of the logic was executed in this one script, the game loop, the paddle movement, the ball movement, AI, sound, and drawing.
Unity, on the other hand, is structured around game objects. So everything is a game object, and each game object executes its own code. Additionally, Unity has built in events like Start() and Update() and others that automatically run that we can take advantage of.
Unity has a number of features that make it an excellent choice for game development. First, it offers robust tools for creating 3D and 2D games. The Unity engine also supports most major platforms, including Windows, Mac, iOS, Android, and Xbox.
With pygame, producing a build that people can actually play is actually difficult. You can’t compile to WebGL that can be uploaded to itch.io for play in the browser. And to build to an executable that can be played on Mac or Windows requires use of things like pyinstaller or py2exe.
Unity can target pretty much any environment without having to manage the build yourself. This is the one huge advantage it has that actually made me want to use Unity instead of Pygame.
When I finished the pygame game, I looked into how I would get it to itch.io to be on my portfolio page. I gave up after looking into it. If anyone knows an easy way to do this, leave a comment down below. So because I can get this to itch.io easily using Unity is a major advantage of Unity.
The other thing Unity has that we had to implement ourself in Python was the concept of Time.deltaTime. This is built into Unity. Also, in python we had to implement the physics ourselves, whereas Unity has a built-in physics engine that we can take advantage of.
So to port this from Pygame to Unity, we need to split the code into separate scripts depending on what objects the code is for and what it needs to do.
The advantage to splitting everything into objects is that you can do things that a single python script can’t do, like event architecture, where objects can send notifications that other objects subscribe to. We will implement a simple event architecture in Unity as part of this article.
So let’s get going, and implement Pong in Unity. I won’t actually use most of the code that was in pygame, as it’s not needed in Unity. So this is almost a reimplementation rather than a straight port.
Implementing Pong in Unity
Create a new 2D project in Unity, called Pong or whatever you want to name it, and put it whereever you want, I always use a folder called UnityProj to put all my Unity projects in one place.
Once your 2D project is open, create a new Scene and call it Main. Open this new scene and delete the SampleScene.
Set the Main Camera properties:
- Clear Flags: Solid Color
- Background: Black
- Size: 300
- Viewport Rect: W = 800, H = 600
- Position: X = 400, Y = 300
This gives us an 800×600 screen with a black background as we had in the Pygame version.
In the Game view, create a new display profile and set that to 800×600.
Let’s create some folders in the Project window under Assets: Materials, Prefabs, Scripts, SoundEffects, and Scenes.
Drag your Main scene into the Scenes folder.
Also, we need 2 sound effects for this game, you can get them at freesound.org.
They are score-1 : https://freesound.org/people/CJspellsfish/sounds/676401/
and PongGameSounds.wav
https://freesound.org/people/mickdow/sounds/177409/
What you want to do with the second one is load it into Audacity (download for free at https://www.audacityteam.org/) and edit it down to just the one tenth of a second where the ball hits the paddle, that iconic “pong” sound. I called mine paddle_hit.wav.
Drag those 2 sound effect files into your SoundEffects folder. We’ll use those much later. You can use the same files you used if you followed the Pygame article, that’s what I did for this.
Creating Game Objects
Game Over text
In the hierarchy, click the + button and select UI->Text – TextMeshPro to create a text object. Name it GameOverText. The TextMeshPro Essentials dialog will pop up, and you need to click the Install button. Once that is done, you can close the dialog.
Position GameOverText in the center of the screen, give it a size of 72 points, and set wrapping to Disabled. Then deactivate the game object by unchecking its checkbox at the top of the inspector.
Paddles
In the hierarchy, create a 2D Objects->Sprite-Square called Player. The scale should be x=15, y=75. Position it at x=50, y=300, color = default White.
Duplicate this object and rename the duplicate to AI. You can just click the Player and hit Ctrl-D or Command-D on the Mac, or right-click the object and select Duplicate.
Set its position to x=750, y=300.
Duplicate the Player once again, name the duplicate Ball. Set the scale to x=10, y=10 and position to x=400, y=300. This sets it in the center of the screen.
On the Ball, add a Box collider 2D component, and a Rigidbody2D component by clicking the Add Component button in the Inspector.
The properties for the collider should be fine at default, on the RigidBody2D component set Gravity Scale to 0, and click the freeze rotation Z checkbox in the Constraints.
On the Player and AI objects, add a BoxCollider2D and a RigidBody2D component to them. On both of them, set the Gravity scale = 0, and enable the freeze position X, and freeze position Z checkboxes. We only want the paddles to move in Y. For the Player, also enable freeze position Y. I found there to be a bug in that sometimes the ball hits the paddle at a certain angle and causes the paddle to move up in Y automatically instead of just with player input. Freeze position Y fixes this. And since we are going to be using code to move the paddle up and down, and not physics, we can enable this checkbox.
Physics Material
In your Materials folder, create a Physics Material 2D (+ button ->2D->Physics Material 2D) and name it PaddlePhysics.
Set the bounciness and friction both to 1. Bounciness = 1 will allow objects such as the ball to bounce off it as we want. Friction can be set to any value, you can add more friction to create more “action” on the ball as it bounces off the paddle. I set mine to 1. If you use 0 I found that the ball isn’t as dynamic when it bounces off. Experiment to find the value you like.
Apply the Physics Material to both the Player and AI RigidBody2D components by clicking the round target icon next to the Material property and double click the PaddlePhysics material.
Creating Scripts
Create 3 scripts in the Scripts folder: Player, AI, and Ball. Attach each script to the corresponding object by dragging the script on top of the object.
Open the Ball script by double-clicking it. Add this code at the top of the script:
[SerializeField]
private float speedX = 0;

[SerializeField]
private float speedY = 0;
This creates 2 fields in the Inspector for the Ball. Set the speedX to -20000 and speedY to 0. This just sets the initial speed, it can be adjusted to how you like it.
Also add this under the speed variables:
private Rigidbody2D ballRb;And in the Start() method add:
ballRb = GetComponent<Rigidbody2D>();

Vector2 force = new Vector2(speedX, speedY);

ballRb.AddForce(force);
This will get the ball’s rigid body and add an initial force to it so that it starts moving when the game starts.
If you press play now, you should see the ball moving to the left and it will bounce off the player and AI paddles. Yay physics! There was no code involved (that we had to write) in handling the collision and ball movement apart from adding an initial force to it.
The ball currently only moves in X, bouncing back and forth forever. So to add a Y movement to it, we can add a random force to the Y direction when it hits something. This is just a simple way of doing it, more complicated logic can be written that looks at where on the paddle the ball hit and add a force accordingly, but we will keep it simple in this tutorial.
Add this to the top of the ball script:
[SerializeField]
private float yForceRange = 100;
and add this method :
private void OnCollisionEnter2D(Collision2D collision)
{
        float yForce = Random.Range(-yForceRange, yForceRange);
        Vector2 force = new Vector2(0, yForce);
        ballRb.AddForce(force);
}
This will calculate a random float between the negative and positive of the yForceRange, and add that as a yForce to the ball’s rigid body.
OnCollisionEnter2D is a built-in method that Unity calls whenever there is a collision.
So now the ball should move in the Y direction slightly when it hits a paddle.
Top and Bottom Barriers
Currently the ball will leave the screen and keep going forever. The first step in fixing it is to make sure it cannot leave the screen from the top and bottom. We want it to bounce off when it hits the top and bottom of the screen.
We could do this in code, but Unity makes it much easier by just taking advantage of physics to do it.
So create a new 2D sprite Square, named TopWall. Position it at X = 400, Y = 605. Scale it to X=800, Y=10. Add a BoxCollider2D to it. In the BoxCollider2D Material, set it to PaddlePhysics.
Duplicate TopWall and call it BottomWall. Set the position to X=400, y = -5.
These walls will sit just off the edge of the top and bottom of the screen, and prevent the ball from going off the screen in those directions. Because of the colliders and physics material it will automatically bounce off like we want it to.
Next, we want the Ball to not keep going forever if it goes off the screen to the left or right. We will have it destroy itself if this happens.
Add to the Ball script:
[SerializeField]
float leftBound = 0;

[SerializeField]
float rightBound = 800;
and in the Update():
void Update()
 {
        if (transform.position.x < leftBound)
        {
            Destroy(this.gameObject);
        } else if (transform.position.x > rightBound)
        {
            Destroy(this.gameObject);
        }
}
This just checks if the ball’s position in X is less than the left side of the screen or if it is greater than the right side of the screen. In either of those cases, it will call Destroy(this.gameObject) to destroy itself. We’ll revisit this code later, as this will be part of the scoring mechanism. But for now, the ball will now be destroyed if it goes off screen.
AI Logic
We will use the same simple AI logic that the Pygame version used. The AI will attempt to match the Y position of the ball. This actually makes for a difficult AI opponent, it is extremely hard to get the ball past it.
So open the AI script and add to the top:
[SerializeField]
float paddleSpeed = 5;

[SerializeField]
float topBound = 560;

[SerializeField]
float bottomBound = 40;

private Ball ballPrefab;
In the Start method:
void Start()
{
    ballPrefab = GameObject.FindObjectOfType<Ball>();
}
in the Update method add:
  if (ballPrefab == null)
  {
    ballPrefab = GameObject.FindObjectOfType<Ball>();
  }

  if (ballPrefab != null)
  {
    float ballCenterY = ballPrefab.GetComponent<SpriteRenderer>().bounds.center.y;
    float centerY = GetComponent<SpriteRenderer>().bounds.center.y;

    // attempt to follow the ball Y position
    if (centerY < ballCenterY)
    {
      float newYPos = transform.position.y + (paddleSpeed * Time.deltaTime);
      transform.position = new Vector2(transform.position.x, newYPos);
    }

    if (centerY > ballCenterY)
    {
      float newYPos = transform.position.y - (paddleSpeed * Time.deltaTime);
      transform.position = new Vector2(transform.position.x, newYPos);
    }
  }
This simply just tries to find the Ball if it doesn’t already have a reference to it (if the ball had been destroyed and re-instantiated), then if the Ball exists, it checks the center Y position of the ball and compares it to the AI paddle’s center Y position. If the ball’s Y is greater, we move the paddle up, and if it is less than, we move the paddle down. In both cases we increment or decrement using the paddle speed multiplied by Time.deltaTime.
We also want to prevent the AI paddle from going off the top or bottom of the screen, so add this code to the Update method:
// prevent AI paddle from leaving top and bottom of the screen
if (transform.position.y > topBound)
{
  transform.position = new Vector2(transform.position.x, topBound);
}
else if (transform.position.y < bottomBound)
{
  transform.position = new Vector2(transform.position.x, bottomBound);
}
We just check if the paddle’s y position is outside the top or bottom bounds, and if it is, it sets the y position to those bounds.
With this code in place, we are basically done with the AI player. We’ll come back to it later when we implement the game over state.
Player Script
Now that the AI can move, we need to implement player movement.
Open the Player script and add this to the top:
[SerializeField]
float paddleSpeed = 10f;

[SerializeField]
float topBound = 560;

[SerializeField]
float bottomBound = 40;
and in the Update method add:
if (Input.GetKey(KeyCode.W))
{
  // move paddle up
  float newY = transform.position.y + (paddleSpeed * Time.deltaTime);
  transform.position = new Vector2(transform.position.x, newY);
}
else if (Input.GetKey(KeyCode.S))
{
  // move paddle down
  float newY = transform.position.y + (-paddleSpeed * Time.deltaTime);
  transform.position = new Vector2(transform.position.x, newY);
}
We are just checking if the W or S key is being held down, and if they are, the transform position Y of the player’s paddle is moved up or down based on the paddleSpeed multiplied by Time.deltaTime.
We should also prevent the player from going off the top or bottom of the screen as well, so add this to the Update method as well:
if (transform.position.y > topBound)
{
  transform.position = new Vector2(transform.position.x, topBound);
}
else if (transform.position.y < bottomBound)
{
  transform.position = new Vector2(transform.position.x, bottomBound);
}
This is the same code we used for the AI script.
Now you should be able to control the player’s movement with the W and S keys.
Creating Ball Prefab
The Ball is going to be a prefab that will be instantiated at runtime. So drag the Ball from the hierarchy to the Prefabs folder. The object should turn blue in the hierarchy, telling us that it is a prefab.
You can now safely delete the Ball from the hierarchy.
Adding a Game Manager
We don’t have a game yet, as the ball will disappear forever once either the player or AI miss it.
So we need a game manager to keep track of the score, instantiate the ball and detect when the game is over.
So to create one, in the hierarchy click the + button and select “Create Empty”. This will create an empty game object that we can attach a script to.
Create a script called GameManager in the Scripts folder. Notice that Unity changes its icon to a gear. Unity recognizes a script called GameManager, it doesn’t actually do anything special except change the icon though.
Attach the script to the GameManager object.
Raising an Event
We are going to use an event-based model to manage the scoring. The Ball itself will raise an event when it goes off the screen to the left or the right, just before destroying itself.
Our Game Manager will subscribe to this event. So when it receives the event, the Game Manager will know when to update the score and respawn the ball for the next round.
Without using events, the Game Manager would have to continually check the ball’s location and detect when it went off screen. This is a lot of extra CPU cycles that we don’t need.
So, in this scenario, the Game Manager is the observer, and the ball will tell it when it needs to act. This is known as the Observer pattern in game development.
We will have the Ball generate an event called OnScored when it scores.
In the Ball script add:
public delegate void ScoreAction(string side);
public static event ScoreAction OnScored;
This defines a delegate called ScoreAction that takes a string parameter “side”. A delegate just basically defines what the event needs to look like.
And then the public static event line defines the actual event that will be raised, called OnScored. This will be called by the Ball like a function, passing it a string. These 2 lines are public so that the other objects that need to subscribe to the event can do so.
Note that nothing has to subscribe to the event, in which case OnScored will be null. So when we are raising the event we need to only raise it if OnScored Is not null.
In the Ball script’s Update method change the existing code to this:
if (transform.position.x < leftBound)
   {
      if (OnScored != null)
      {
         OnScored("left");
      }

      Destroy(this.gameObject);
   } else if (transform.position.x > rightBound)
   {
      if (OnScored != null)
      {
          OnScored("right");
      }

      Destroy(this.gameObject);
   }
The previous code is still there to destroy the ball when it leaves the screen. All we have done is add the call to OnScored, passing it “left” or “right” corresponding to which side of the screen the ball went off. The call is only made if there are subscribers to it. Otherwise, no event will be raised.
Subscribing to the Event
The game manager needs to subscribe to this new event. So in the GameManager script add:
private void OnEnable()
{
    Ball.OnScored += this.OnScored;
}

private void OnDisable()
{
    Ball.OnScored -= this.OnScored;
}
OnEnabled and OnDisabled are events that Unity provides when an object is enabled or disabled. So we want to use those to subscribe and unsubscribe to the event. Ball.OnScored is known to the GameManager because the event is public. So all the game manager needs to do is add itself to the list of subcribers which is done by:
Ball.OnScored += this.OnScored;And to unsubscribe we use -=. We must unsubscribe to it to avoid memory leaks when the Game Manager gets disabled.
But what is our OnScored? We need to implement a method that looks like the delegate that is defined in the Ball script.
So add this to the GameManager script:
At the top:
[SerializeField]
private int playerScore = 0;

[SerializeField]
private int aIScore = 0;
Then add this method:
private void OnScored(string side)
{
  if (side == "left")
  {
    aIScore++;
  } else
  {
    playerScore++;
  }

  UpdateScores();
  SpawnBall();
}
This will increment the player score or AI score depending on which side scored. If the ball goes off the left side, the AI scored. Otherwise it was the Player that scored.
We will be able to see the scores in the Inspector if we click on the Game Manager, but the player of the game will not see them. We use UpdateScores to update the scores on the screen. And then the GameManager calls SpawnBall() to respawn the ball for the next round.
Add a new method SpawnBall:
[SerializeField]
private GameObject ballPrefab;

private void SpawnBall()
{
  Instantiate(ballPrefab);
}
This simply instantiates the ball Prefab in its default location (defined in the prefab transform) in the center of the screen. The ball instance takes care of its own motion as defined in the Ball script.
The GameManager needs to know what the prefab is that it needs to instantiate, so drag the ball prefab from the prefabs folder into the Ball Prefab field in the GameManager’s inspector.
If you forget to do this, you’ll get an error “UnassignedReferenceException” because it’s trying to instantiate a null object.
Now we need to implement the UpdateScores() method:
At the top of the script add:
[SerializeField]
private TextMeshProUGUI playerScoreText;

[SerializeField]
private TextMeshProUGUI aiScoreText;

private void UpdateScores()
{
  playerScoreText.text = playerScore.ToString();
  aiScoreText.text = aIScore.ToString();
}
This adds 2 TextMeshPro text objects that we can set the text for. So when the score is updated, it just updates the text with the current score for the player and the AI.
We need to create those objects in the Hierarchy, so create 2 new UI->Text – TextMeshPro objects called PlayerScore and AIScore. Set the initial text to 0 and position them on the screen where you prefer them. I placed mine at 100, -50 (relative to the top left corner) for the Player, and 50, -50 (relative to the top right corner) for the AI.
Then drag those new objects into the GameManager’s PlayerScoreText and AIScoreText fields in the inspector.
Spawning the Ball – Coroutine
We can now display the score, and the ball is respawned after someone scores. But the respawn happens right away, which can be way to fast for a player to react to.
So we will make the SpawnBall method a Coroutine instead. This allows us to introduce a delay in the game before the ball is respawned.
In the GameManager script, replace SpawnBall() with this:
private IEnumerator SpawnBall()
{
  yield return new WaitForSeconds(1.0f);
  Instantiate(ballPrefab);
  yield return null;
}
And update the call to SpawnBall with this:
StartCoroutine(SpawnBall());A Coroutine has to return an IEnumerator, and we can return a new WaitForSeconds object to make it wait for a set number of seconds. Once the wait is done, execution is returned back to the Coroutine to continue. So in this case we are waiting 1 second, then instantiating the Ball prefab. Yield return null returns execution back immediately, and the method completes. Yield return null really means “come back next frame”. So in our case there is no code after it, so next frame it ends the method.
And we call a Coroutine with StartCoroutine and pass in the method that returns the IEnumerator. That’s SpawnBall() for us.
Game Over State
To make this a full real game, we need to keep track of when the game is over, otherwise it lasts forever. So for our purposes, we will say the game is over when either player reaches a target score.
We will use an event here as well. This time it will be the GameManager who raises an event when the game is over.
The Game Manager will detect when the game is over if either the player or AI hit a target score. When this happens, the game manager will raise a game over event that the player and AI scripts will subscribe to. When the game is over, the player and AI will no longer respond to player and AI control. The game over text will be displayed and the ball will not be spawned.
In the Game manager script, add
public delegate void GameOver();
public static event GameOver OnGameOver;

private bool isGameOver = false;

[SerializeField]
private TextMeshProUGUI gameOverText;
Assign the GameOverText UI object to the gameOverText in the inspector. Also ensure that the GameOverText UI object is disabled.
In UpdateScores() add this:
if ((playerScore >= targetScore) || (aIScore >= targetScore))
{
  isGameOver = true;

  if (OnGameOver != null)
  {
    OnGameOver();
  }

  gameOverText.gameObject.SetActive(true);
}
This will set the game over state to true and notify any subscribers (if any) that the game is over, and will also display the game over text to the screen by making it active using gameObject.SetActive , a built-in method that Unity provides for all game objects.
In the OnScored event method, add this:
if (!isGameOver)
{
  StartCoroutine(SpawnBall());
}
This will prevent the ball from being spawned again if the game is over because one of the players hit the target score.
In both the Player and AI script, add this:
private bool isGameOver = false;

private void OnEnable()
{
  GameManager.OnGameOver += this.OnGameOver;
}

private void OnDisable()
{
  GameManager.OnGameOver -= this.OnGameOver;
}

private void OnGameOver()
{
  isGameOver = true;
}
This will subscribe the Player and AI to the OnGameOver event, and they will update their local game over state to true.
Then in the Update() method we need to wrap the existing code in this:
if (!isGameOver)
{
  {Insert existing code}
}
So if the game is not over, the normal Update handling will take place.
So now when the game is over, the Game Manager notifies that it is over, and both subscribers receive the notification and act accordingly.
Now all we need is to implement a way to restart the game when it is over.
Create a new UI Button called RestartButton. Update the text element to have the text “Restart”. You can change the width and height and position of the button to place it somewhere on the screen.
In the Game Manager script, add the following method:
public void RestartGame()
{
  SceneManager.LoadScene(0);
}
LoadScene will reload the scene completely, so we don’t have to reset the scores or game over state or respawn the ball. That will all happen automatically when the scene is loaded. The 0 is telling Unity to load Scene 0 as defined in the File->Build Settings menu. Open that now and ensure Scenes/Main is listed as 0 with a checkbox next to it. If it is not, click the “Add Open Scenes” button to add it.
And add a using directive to the top:
using UnityEngine.SceneManagement;This is a convenience so we don’t have to say
UnityEngine.SceneManagement.SceneManager.LoadScene(0); But either way will work.
Change the gameOverText to gameOverScreen and make it a GameObject :
[SerializeField]
private GameObject gameOverScreen;
in UpdateScores(), change the existing code that activated gameOverText to this after the OnGameOver() event is raised:
gameOverScreen.SetActive(true);In the Unity editor, create a new empty game object in the hierarchy called GameOverScreen. Drag it under the Canvas object. Then drag the GameOverText and RestartButton objects into the GameOverScreen object. Make sure they are active and deactivate the GameOverScreen game object.
This way we only have to activate one object instead of 2 when the game is over.
Assign the GameOverScreen game object to the GameManager gameOverScreen variable in the hierarchy by dragging it into the field.
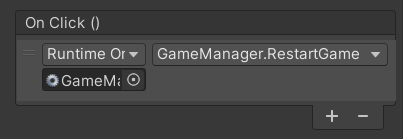
In the RestartButton, we need to add the OnClick() method by scrolling down and clicking the + button under the OnClick() area, drag in the GameManager object, and select GameManager.RestartGame as the action.
Now it should be all set, once either player reaches the target score, the game is over and the restart button should show. Clicking the button should restart the game from the beginning.
Adding sound
Recall that way back at the beginning, we added 2 sound effects to the SoundEffects folder in the project. Now is the time to use them.
Add an audioSource component to the Ball prefab, and set the AudioClip to paddle_hit. Ensure Play on Awake is unchecked.
In the Ball script:
private AudioSource audioSource;in Start(), add this:
audioSource = GetComponent<AudioSource>();in OnCollisionEnter2D add this:
audioSource.Play();This will play the sound effect whenever the ball hits a paddle or one of the top and bottom walls
Add an AudioSource component to the GameManager. Set the AudioClip to score-1. Ensure Play on Awake is unchecked.
In the GameManager script:
private AudioSource audioSource;in Start(), add as the first line before the Coroutine is called:
audioSource = GetComponent<AudioSource>();in OnScored , add
audioSource.Play();right after the first if statement and before the UpdateScores() call.
Now it will play the sound effect whenever either player scores.
That’s it for this implementation of Pong. There are improvements that can be done to the code such as adding code to do more “English” on the ball if the paddle is moving up or down when it strikes the ball. You could also increase the ball’s speed over time, or add a trailing effect to it.
If you would like to see a video that follows this tutorial, here is a YouTube video showing the full implementation.
You can also access the Github repository for this project here.
I am interested in what you think about this article, so leave your comments down below, and I will reply to them.